public void mciConvertWavMP3(string fileName, bool waitFlag)
{
//maxLen is in ms (1000 = 1 second)
string outfile= "-b 32 --resample 22.05 -m m \""+pworkingDir+fileName + "\" \"" + pworkingDir+fileName.Replace(".wav",".mp3")+"\"";
System.Diagnostics.ProcessStartInfo psi=new System.Diagnostics.ProcessStartInfo();
psi.FileName="\""+pworkingDir+"lame.exe"+"\"";
psi.Arguments=outfile;
//psi.WorkingDirectory=pworkingDir;
psi.WindowStyle=System.Diagnostics.ProcessWindowStyle.Minimized;
System.Diagnostics.Process p=System.Diagnostics.Process.Start(psi);
if (waitFlag)
{
p.WaitForExit();
// wait for exit of called application
}
}
This code will help us to convert .wav file in to .mp3
...S.VinothkumaR.
Compress mp3 file using Lame.exe in C#
We can compress mp3 file using Lame.exe easily as follows. The following code will help us to reduce the mp3 file’s size without losing much more of quality. For that we need to put lame.exe file in our folder. Find lame.exe and download it.
Code:
private void mp3Encode(string srcFileName, string targetFileName)
{
if (!string.IsNullOrEmpty(srcFileName) &&
!string.IsNullOrEmpty(targetFileName))
{
try
{
string workingDir = AppDomain.CurrentDomain.BaseDirectory + "\\";
string outfile = "-V9 -q0 --resample 32 -B56 --verbose " + '"' + srcFileName + "\" \"" +
targetFileName + "\"";
System.Diagnostics.ProcessStartInfo psi = new System.Diagnostics.ProcessStartInfo();
psi.FileName = workingDir + "lame.exe";
psi.Arguments = outfile;
psi.WindowStyle = System.Diagnostics.ProcessWindowStyle.Hidden;
p = System.Diagnostics.Process.Start(psi);
while (p.HasExited == false)
{
Thread.Sleep(10);
Application.DoEvents();
}
p.Dispose();
}
catch (Exception ex)
{
MessageBox.Show(ex.Message);
}
}
}
private void frmConvertor_FormClosing(object sender, FormClosingEventArgs e)
{
if (p != null)
{
p.Dispose();
}
}
Hope this will help us to reduce our mp3 file’s size…
....S.VinothkumaR.
mciSendString in C#
The mciSendString function sends a command string to an MCI device. The device that the command is sent to is specified in the command string.
Code:
using System.Runtime.InteropServices;
[DllImport("winmm.dll")]
private static extern long mciSendString(string strCommand, StringBuilder strReturn, int iReturnLength, IntPtr oCallback);
public string playCommand;
public string fileName;
public bool isPlay = false;
public bool isStop = false;
private void frmPlayer_Load(object sender, EventArgs e)
{
if (!string.IsNullOrEmpty(fileName))
{
try
{
if (File.Exists(fileName))
{
if (isPlay)
{
playCommand = "Close MediaFile";
mciSendString(playCommand, null, 0, IntPtr.Zero);
isPlay = false;
isStop = true;
}
playCommand = "open \"" + fileName + "\" type mpegvideo alias MediaFile";
mciSendString(playCommand, null, 0, IntPtr.Zero);
playCommand = "play MediaFile";
mciSendString(playCommand, null, 0, IntPtr.Zero);
isPlay = true;
btnPlayPlayer.Enabled = true;
btnPause.Enabled = true;
btnStop.Enabled = true;
}
else
{
isPlay = false;
btnPlayPlayer.Enabled = false;
btnPause.Enabled = false;
btnStop.Enabled = false;
MessageBox.Show("Invalid File!");
}
}
catch (Exception ex)
{
isPlay = false;
btnPlayPlayer.Enabled = false;
btnPause.Enabled = false;
btnStop.Enabled = false;
MessageBox.Show(ex.Message);
}
}
}
private void btnPlayPlayer_Click(object sender, EventArgs e)
{
if (!isPlay)
{
if (isStop)
{
playCommand = "open \"" + fileName + "\" type mpegvideo alias MediaFile";
mciSendString(playCommand, null, 0, IntPtr.Zero);
playCommand = "play MediaFile";
mciSendString(playCommand, null, 0, IntPtr.Zero);
isPlay = true;
isStop = false;
}
else
{
playCommand = "play MediaFile";
mciSendString(playCommand, null, 0, IntPtr.Zero);
isPlay = true;
}
}
}
private void btnPause_Click(object sender, EventArgs e)
{
if (isPlay)
{
playCommand = "pause MediaFile";
mciSendString(playCommand, null, 0, IntPtr.Zero);
isPlay = false;
}
}
private void btnStop_Click(object sender, EventArgs e)
{
if (isPlay)
{
playCommand = "Close MediaFile";
mciSendString(playCommand, null, 0, IntPtr.Zero);
isPlay = false;
isStop = true;
}
}
This coding will help us to play media file…
....S.VinothkumaR.
Launch Configuration for Android application in Eclipse
Before you can run and debug your application in Eclipse, you must create a launch configuration for it. A launch configuration specifies the project to launch, the Activity to start, the emulator options to use, and so on.
To create a launch configuration for the application, follow these steps:
1. Select Run > Open Run Dialog... or Run > Open Debug Dialog... as appropriate.
2. In the project type list on the left, right-click Android Application and select New.
3. Enter a name for your configuration.
4. On the Android tab, browse for the project and Activity to start.
5. On the Emulator tab, set the desired screen and network properties
6. You can set additional options on the Common tab as desired.
7. Press Apply to save the launch configuration, or press Run or Debug (as appropriate).
....S.VinothkumaR.
Creating an Android application in Eclipse
The ADT plugin provides a New Project Wizard that you can use to quickly create an Eclipse project for new or existing code. To create the project, follow these steps:
1. Select File > New > Project
2. Select Android > Android Project, and press Next
3. Select the contents for the project:
- Select Create new project in workspace to start a project for new code.
Enter the project name, the base package name, the name of a single Activity class to create as a stub .java file, and a name to use for your application.
- Select Create project from existing source to start a project from existing code. Use this option if you want to build and run any of the sample applications included with the SDK. The sample applications are located in the samples/ directory in the SDK.
Browse to the directory containing the existing source code and click OK. If the directory contains a valid Android manifest file, the ADT plugin fills in the package, activity, and application names for you.
4. Press Finish.
The ADT plugin creates the these folders and files for you as appropriate for the type of project:
- src/ A folder that includes your stub .java Activity file.
- res/ A folder for your resources.
- AndroidManifest.xml The manifest for your project.
.....S.VinothkumaR.
Download and Install Android SDK
You can download the Android SDK at here...
We can develop Android application using eclipse IDE. For that we have to update the eclipse plugin as follows.
1. Start Eclipse, then select Help > Software Updates > Find and Install....
2. In the dialog that appears, select Search for new features to install and press Next.
3. Press New Remote Site.
4. In the resulting dialog box, enter a name for the remote site (e.g. Android Plugin) and enter this as its URL:
https://dl-ssl.google.com/android/eclipse/
Press OK.
5. You should now see the new site added to the search list (and checked). Press Finish.
6. In the subsequent Search Results dialog box, select the checkbox for Android Plugin > Eclipse Integration > Android Development Tools and press Next.
7. Read the license agreement and then select Accept terms of the license agreement, if appropriate. Press Next.
8. Press Finish.
9. The ADT plugin is not signed; you can accept the installation anyway by pressing Install All.
10. Restart Eclipse.
11. After restart, update your Eclipse preferences to point to the SDK directory:
a) Select Window > Preferences... to open the Preferences panel. (Mac OS X: Eclipse > Preferences)
b) Select Android from the left panel.
c) For the SDK Location in the main panel, press Browse... and locate the SDK directory.
d) Press Apply, then OK.
Updating the ADT Plugin
To update the ADT plugin to the latest version, follow these steps:
1. Select Help > Software Updates > Find and Install....
2. Select Search for updates of the currently installed features and press Finish.
3. If any update for ADT is available, select and install.
Alternatively,
1. Select Help > Software Updates > Manage Configuration.
2. Navigate down the tree and select Android Development Tools
3. Select Scan for Updates under Available Tasks.
That's it...
...S.VinothkumaR.
Android
The Android platform is a software stack for mobile devices including an operating system, middleware and key applications. Developers can create applications for the platform using the Android SDK. Applications are written using the Java programming language and run on Dalvik, a custom virtual machine designed for embedded use which runs on top of a Linux kernel.
If you want to know how to develop applications for Android, you can visit the google android page...
If you want to know how to develop applications for Android, you can visit the google android page...
Image Uploading in ASP.NET using C#
This is way I’m trying to explain an image uploading in asp.net using C#.
Here is I’m going to post image in to an url with image byte array. On there a page will save that image byte array in to image in given path.
POST IMAGE
As I mentioned above, the following method is going to use post image.
using System.Net;
using System.Text;
using System.IO;
using System.Drawing.Imaging;
using System.Drawing;
private void postImage()
{
HttpWebRequest request;
request = (HttpWebRequest)HttpWebRequest.Create("url");
request.KeepAlive = true;
request.Method = "POST";
byte[] byteArray = ConvertImageToByteArray((System.Drawing.Image)new Bitmap(@"C:\test.jpg"), ImageFormat.Jpeg);
request.ContentType = "image/JPEG";
request.ContentLength = byteArray.Length;
Stream newStream = request.GetRequestStream();
newStream.Write(byteArray, 0, byteArray.Length);
newStream.Close();
}
private static byte[] ConvertImageToByteArray(System.Drawing.Image imageToConvert,ImageFormat formatOfImage)
{
byte[] Ret;
try
{
using (MemoryStream ms = new MemoryStream())
{
imageToConvert.Save(ms, formatOfImage);
Ret = ms.ToArray();
}
}
catch (Exception) { throw; }
return Ret;
}
From above the method postImage() will post the image in to given url as byte array. And the method ConvertImageToByteArray(System.Drawing.Image imageToConvert,ImageFormat formatOfImage) will help us for getting byte array from an image.
UPLOAD IMAGE
The following code will help us save the image….
using System.IO;
using System.Drawing;
using System.Drawing.Imaging;
using System.Net;
using System.Text;
protected void Page_Load(object sender, EventArgs e)
{
try
{
string dirPath = Server.MapPath("Asset") + "\\" ;
Guid imgId = Guid.NewGuid();
string imgPath = dirPath + "\\" + imgId.ToString() + ".jpg";
Response.ContentType = "image/JPEG";
System.Drawing.Image img = Bitmap.FromStream(Page.Request.InputStream);
img.Save(imgPath, ImageFormat.Jpeg);
}
catch { }
}
That's it....
...S.VinothkumaR.
Getting byte array from an image.
private static byte[] ConvertImageToByteArray(System.Drawing.Image imageToConvert,ImageFormat formatOfImage)
{
byte[] Ret;
try
{
using (MemoryStream ms = new MemoryStream())
{
imageToConvert.Save(ms, formatOfImage);
Ret = ms.ToArray();
}
}
catch (Exception) { throw; }
return Ret;
}
...S.VinothkumaR.
{
byte[] Ret;
try
{
using (MemoryStream ms = new MemoryStream())
{
imageToConvert.Save(ms, formatOfImage);
Ret = ms.ToArray();
}
}
catch (Exception) { throw; }
return Ret;
}
...S.VinothkumaR.
Boxing And UnBoxing
Boxing and Unboxing are two important portions of .NET technology. Boxing is nothing but converting a value type object to a reference type object. Unboxing is completely explicit.
Now let us get an idea regarding reference type and value type objects. We all know that a new operator returns the memory address of an object that is allocated from the managed memory (a pool of memory). We usually store this address in a variable for our convenience. These types of variables are known as reference variables. However, the value type variables are not supposed to have the references; they always used to have the object itself and not the reference to it.
Now if we consider the statement written above in Listing 3, the C# compiler will detect System.Int32 as a value type and the object is not allocated from the memory heap, assuming this as an unmanaged one.
In a general way we should declare a type as a value type if the following are true.
1. The type should be a primitive type.
2. The type does not need to be inherited from any other types available.
3. No other types should also be derived from it.
This example shows how an integer type is converted to a reference type using the boxing and then unboxed from the object type to the integer type.
class Test
{
static void Main()
{
int i = 1; // i is an integer. It is a value type variable.
object o = i;
// boxing is happening. The integer type is parsed to //object type
int j = (int)o;
// unboxing is happening. The object type is unboxed to //the value type
}
}
Leap Year checking in Javascript
Hi all,
Here is I'm going to check the given year is leap or not...How to do....check it out..
I don't state that this code is perfect but it does work.
Just copy and paste the following function in to script tag inside the header tag so that it can be called from anywhere in this HTML document.
function isleap()
{
var yr=document.getElementById("year").value;
if ((parseInt(yr)%4) == 0)
{
if (parseInt(yr)%100 == 0)
{
if (parseInt(yr)%400 != 0)
{
alert("Not Leap");
return "false";
}
if (parseInt(yr)%400 == 0)
{
alert("Leap");
return "true";
}
}
if (parseInt(yr)%100 != 0)
{
alert("Leap");
return "true";
}
}
if ((parseInt(yr)%4) != 0)
{
alert("Not Leap");
return "false";
}
}
Basically this code gives the rules to check if a year is a leap year. If the year is no divisible by 4 then it is not a leap year. If the year is divisible by 100 but not by 400 then it is not a leap year. Otherwise the remaining options leave us with a leap year so I hard coded what to do. The Reason I have coded in what to do otherwise is to highlight the two different statements of verifying that something does match and verifying something does not match.
Just call this script function where you want...as follows,
onclick="isleap()"
that's it....
...S.VinothkumaR.
Caching in ASP.NET 2.0
Here is the different kind of caching that you can use in your web applications:
· Output Caching
· Fragment Caching
· Data Caching
· Cache Configuration
Output Caching
Performance is improved in an ASP.NET application by caching the rendered markup and serving the cached version of the markup until the cache expires. For example, if you have a page that displays user information from a database, caching will help improve performance by serving the page from memory instead of making a connection to the database on each page request.
You can cache a page by using the OutputCache API or simply by using the @OutputCache directive.
<%@ Page Language=”C#” %>
<%@ OutputCache Duration=”15” VaryByParam=”none” %>
The above cache directive will cache the page for 15 minutes.
So output caching is great for when you want to cache an entire page.
Fragment Caching
In many situations caching the entire page just isn’t going to cut it, for some reason or another you require specific sections of the page to display live information. One way to improve performance is to analyze your page and identify objects that require a substantial overhead to run. You can build a list of these objects that are expensive to run, and then cache them for a period of time using fragment caching.
For example, say your page default.aspx consists of three user controls. After looking over the code, you identified that you can cache one of them. You can simply add the caching directive to the top of the user control:
<%@ Control %>
<%@ OutputCache Duration=”5” VaryByParam=”none” %>
Now keep in mind that the actual page that contains the control is not cached, only the user control. This means that the default.aspx page will be rendered each and every page request, but the user control is only ‘run’ every 15 minutes.
Data Caching
So we know that we can cache an entire page, or a fragment of a page by caching down to the user control level. Wouldn’t it be great if we could cache down to the object level? The good news is you can with ASP.NET Data caching.
The cache consists of a dictionary collection that is private to each application in memory. To insert items in the cache simply provide the collection with a unique name:
Cache[“someKey”] = myObject;
Retrieving the object form the cache:
myObject = (MyObject)Cache[“someKey”];
It is a good time to point out that you should always remember to check for null, and be sure to caste to your datatype.
Cache Configuration
If you are familiar with how caching worked in ASP.NET 1.0, you realize that managing all the cache directions for all your pages could potentially get out of hand. ASP.NET 2.0 introduces Cache Profiles that helps you centrally manage your cache. Cache settings can be inherited by your pages, and overridden if required by using the OutputCache directive.
The page directive looks pretty much the same, expect this time it references a cache profile that you defined in your web.config file.

So each and every page that references the ‘myCacheProfile1’ can be centrally managed in the web.config, this means that any changes to the cache settings in the web.config file will be automatically changed on all your referenced pages.
...S.VinothkumaR.ASP.Net page life cycle
Here is I’m going to explain, behind the scenes when a ASP.NET page loads.
The following are the various stages a page goes through:
Page Request
The request page is either parsed or compiled, or fetched from the cache.
Start
Page properties like the Request and Response are set. The type of request is determined, specifically whether it is a new Request or it is a PostBack. Culturing properties are also determined via the pages ICulture property.
Page Initialization
All the controls on the given page are initialized with a UniqueID (please don’t confused this with the ID property as the UnqiueID is a unique, hierarchicial identifier which includes the server control’s naming container). Theming is also applied at this stage.
Load
If the current request is a PostBack, the data from the viewstate and control state is loaded to the appropriate properties of the controls.
Validation
The Validate method of all the validator controls are fired, which in turn sets the Boolean property IsValid of the controls.
Postback Event Handling
If the current request is a PostBack, all event handlers are called.
Rendering
ViewState data is saved for all the controls that have enabled viewstate. The Render method for all the controls is fired which writes its output to the OutputStream via a text writer.
Unload
Once the page has been rendered and sent, the Page’s properties are unloaded (cleanup time).
So know you have a better understanding of the various stages of a ASP.NET pages life cycle, you should be aware that within each of the above stages there are events that you can hook into so that your code is fired at the exact time that you want it to.
Event Wire-up is another important concept to understand. So Event wire-up is where ASP.NET looks for methods that match a naming convention (e.g. Page_Load, Page_Init, etc) , and these methods are automatically fired at the appropriate event. There is a page level attribute AutoEventWireup that can be set to either true or false to enable this behaviour.
Below are some of the more popular events that you should understand as you will most likely be interested in them:
PreInit
You can use this event to:
· Create /recreate dynamic controls
· Set a master page or theme dynamically
· Access profile properties
Init
Used to read or initialize your control properties.
InitComplete
Used when you need to access your properties after they have been initialized.
PreLoad
Used when you need to process things before the Load event has been fired.
Load
The Page’s OnLoad method and all of its child control’s OnLoad method are fired recursively. This event is used to set properties and make database connections
Control Events
Control specific events are handled at this stage. e.g. Click event’s for the button control.
LoadComplete
This stage is for when you need to access controls that have been properly loaded.
PreRender
Can be used to make any ‘last chance’ changes to the controls before they are rendered.
SaveStateComplete
This event is used for things that require view state to be saved, yet not making any changes to the controls themselves.
Render
The page object calls this method on all of the controls, so all the controls are written and sent to the browser.
Unload
All the controls UnLoad method are fired, followed by the pages UnLoad event (bottom-up). This stage is used for closing database connections, closing open files, etc.
It is import to understand that each server control has its very own life cycle, but they are fired recursively so things may not occur at the time you think they do (they occur in reverse order!). What this means is that some events fire from the bottom up like the Init event, while others load from the top-down like the Load event....S.VinothkumaR.
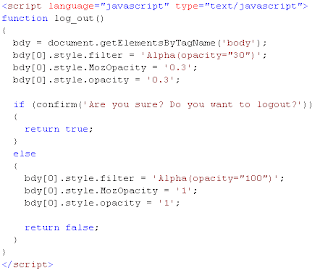
LogOut Effect in IE, FireFox and OPERA
The following script will help you to do the effect when you click the logout button .
Copy and paste the following script in to your head section and call the log_out() in button click.
...S.VinothkumaR.
Copy and paste the following script in to your head section and call the log_out() in button click.

...S.VinothkumaR.
DataTable in C#
Here is the sample code for creating and assigning values in to a datatable and set to datagrid via coding….
DataTable dt = new DataTable();
dt.Columns.Add("S.No", typeof(string));
dt.Columns.Add("UserID",typeof(string));
dt.Columns.Add("FamilyId",typeof(string));
dt.Columns.Add("PhotoGalleryId",typeof(string));
dt.Columns.Add("FileName",typeof(string));
dt.Columns.Add("Status", typeof(string));
dt.Columns.Add("Success", typeof(string));
dt.Columns.Add("ImagePath", typeof(string));
command=new SqlCommand("select * from [Assets]",connection);
connection.Open();
SqlDataReader reader = command.ExecuteReader();
int i = 1;
while(reader.Read())
{
Dr=dt.NewRow();
Dr[0] = i.ToString();
Dr[1] = reader.GetValue(1);
Dr[2] = reader.GetValue(2);
Dr[3] = reader.GetValue(3);
Dr[4] = reader.GetValue(4);
Dr[5] = reader.GetValue(5);
Dr[6] = reader.GetValue(7);
Dr[7] = ConfigurationManager.AppSettings["OrgImgAnchor"];
dt.Rows.Add(Dr);
i += 1;
}
grdStatus.DataSource = dt;
grdStatus.DataBind();
connection.Close();
...S.VinothkumaR.
Subscribe to:
Posts (Atom)